overview
Making Legit Mochi from Rice with a Machine!
Welcome back to our Mochi Making Journey! If you’re just joining us, feel free to catch up with Part 1 where we tried steaming, Part 2 when we tried cooking over the stove, Part 3 when we tried shiratamako rice flour, and finally Part 4 where we used mochigome and a stand mixer.
We’re excited to share with you this opportunity to test the Tiger mochi making machine. A local viewer and fellow mochi lover saw our videos and generously lent us her machine so that we could try out luck at making the perfect mochi at home, so today we are just going to walk you through the recipe that is provided with the machine and see how using the mochi machine compares to making it with the stand mixer method.
About the Tiger Mochi Maker Machine
This nifty Japanese made mochi maker can help you cook rice via steaming, pound rice into mochi, and also pound miso apparently. It has a 10 Cup capacity and the smallest recipe listed in the booklet starts at 5 cups, which can be quite a lot of mochi, more on that later! It’s a bit bulky in size but not too heavy to move around. Keep in mind that wherever you’re going to use it, you want it on a very stable surface and enough space around it as it gets a bit hot when pounding. The interface is super simple, so that’s great, but be warned that the buzzing sound that alerts you that the rice is finished is LOUD, a little shocking when compared to other Japanese machines that have such delightful sounds. The machine is quite an investment given its size and cost, a pretty penny of about $260. So let’s give it a try and see if it’s worth it!
Tiger Mochi Recipe
From Tiger Mochi Maker Manual (PDF)
Total Cook Time: About 1.5 hours
Have everything set up and ready to go, once the rice is steamed, you cannot stop the process.
Materials
- Tiger Mochi Maker Machine
- Kitchen towel/Mittens
- Bowl for soaking rice
- Strainer for draining rice
- Cupcake liners (optional)
Ingredients
- 5 C of sweet rice (mochigome)
- 2 C water (use the same measuring cup used for rice)
- potato starch/cornstarch (for dusting)
- (for Daifuku mochi) Filling: we used matcha-an but also love red bean paste
How to Make Mochi Guide
- Wash rice until the water runs clear.
- Soak rice for 6-12 hours, we soaked ours for 8. Do not soak it for over 24 hours or anywhere cold where the water might freeze.
- Prep any fillings and cupcake liners or whatever you choose to keep your finished mochi in.
- After soaking, drain your rice fully, suggested time: 30 minutes.
- Steam the rice: pour the water into the machine. Mount the inner container and lock into place. Place the impeller onto the motor shaft. Pour the rice in and gently level it out without compressing any of the rice. Place the cover on and then press the steam button. Steaming 5 cups of rice took us about 25-30 minutes. Warning: the buzzer will be really loud.
- Pound the rice: As soon as the rice is finished cooking, carefully remove the lid (which may be hot) and press the pound button. They recommend not pounding for more than 10 minutes, but we found other online users to pound until 15-20 minutes. When the rice didn’t come together for us by 10 minutes, we nudged the mochi and was able to get it to finish pounding in about 13 minutes. Instructions say to sprinkle some water when it’s almost finished pounding for softer mochi.
- When the mochi has come together and is smooth (around 10-15 minutes), it should be done. Press off and carefully remove the hot inner container. Turn over the container on a dusted surface and allow a few moments for the mochi to come away from the container on its own.
- Carefully remove the impeller from the mochi.
- Starch the top of the mochi.
- Piece out your mochi. For more help, see Part 4 Guide.
- When you’ve finished creating your mochi rounds, you can start to assemble your daifuku mochi.
- If you made more mochi than you can eat at once (because 5 cups of rice is a lot), you can store any extra mochi dough in the fridge/freezer to make kiri mochi or ozoni at a later time.
- If the mochi begins to cool and is no longer sticky while you’re working it, you can microwave a few pieces at a time for 5-15 seconds.
- Because there’s no sugar in this mochi recipe, you’ll need to eat your daifuku immediately, maybe even with a quick microwave steaming so they’re not hard.
Step by Step Photos

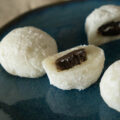
Tiger Mochi Maker Machine Buttons Wash, Soak, & Drain Rice Steamed Rice Starting to Pound rice Pounding rice (5 minutes) Finished Pounding (10-12 minutes) Flip Pounded Mochi onto Work Surface Piece out Mochi Mochi pieces Assemble Daifuku mochi: stretch and thin out the edges Place filling in center Pinch opposite edges together Continue sealing the mochi pinching opposite edges When sealed, flip mochi over and reshape Finished mochi with match filling


Thoughts on Using the Tiger Mochi Maker to Make Mochi (Mochi Making Part 5)
Watching the mochi pound was hilarious and it’s a much simpler process than making mochi using a stand mixer. Sadly though, the booklet is not the clearest, so there might be something we’re missing. If you notice that the rice is not moving or nothing is happening during the pounding, chances are the impeller is not properly set. Or if the pounding starts but seems to get stuck and the mochi never turns smooth, try nudging it away from the walls and it should be able to come together and finish up on its own.
So far our attempts with using rice (vs rice flour) have resulted in much chewier but often drier and harder mochi, which is not the texture we’re hoping for in our daifuku mochi. It seems that we will need to add some sugar to the rice to help soften it and extend its shelf life, so we’ll be testing that next. We will also try to test a smaller quantity than 5 cups, since that’s a ton of mochi even for a whole family. Stay tuned!
Tools Used To Make This Dish*
You can support our experiments at no additional cost to you by using our affiliate links below. Much love!
Camera Gear List*
- Sony A7III
- Sony A7rIII
- Sony SEL2470GM Lens
- Sony SEL90M28G FE 90mm f/2.8-22
- Deity V-Mic D3
- Audio-Technica AT4040 Cardioid Condenser Microphone
- Blue Compass Premium Tube-Style Broadcast Boom Arm
- Sirui ET Series Tripod
- White Balance Card
*We are participants in the Amazon Services LLC Associates Program, an affiliate advertising program designed to provide a means for us to earn fees by linking to to Amazon.com and affiliated sites.