overview
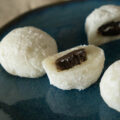
One of my favorite desserts of all time is the fantastically soft and squishy Japanese treat: daifuku mochi (大福餅), or “big luck”. Mochi has long been something we’ve wanted to attempt, but the fear of taking on something with such a long tradition and that seemed complicated held us back. In reality, it’s not that complicated (if you’re using rice flour, as opposed to beating your own mochi from fresh rice). So finally, we’ve decided to change our perspective and look at it like a journey: a process that’s going to take a while to get.
Our very first attempt went ok: it was edible. But the skin kept tearing and it was not as soft as we’d hoped for. The first try is almost always like that – it’s kind of a fail that you needed to go through so you know how one might mess up in this situation and what to look out for next time. A necessary experience.
Today we are taking you along on our second attempt at Namiko Chen’s Daifuku Mochi recipe. From our first try, I’ve learned to starch more sparingly and so subsequent dough forms won’t get too dry. We’ve also adjusted our fresh red bean paste recipe to the family’s less sweet preference. We highly recommend making your own paste so you can control the sweetness of it and that way your whole mochi is fresh. Let’s get started!
Homemade Daifuku (Red Bean) Mochi Recipe
From Namiko Chen’s Just One Cookbook
Materials
- Steam-able bowl
- Large pot good for steaming
- Spatula
- Steamer claw (to move bowl in/out of steamer)
- Parchment paper
- Baking sheet pan
- Rolling pin
- Cupcake liners (optional)
Ingredients
- ¾ cup mochiko flour (115 g)
- ¾ cup water (180 ml)
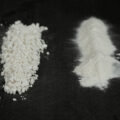
- ¼ – ½ cup sugar (50-100 g) – Do not omit sugar as it helps mochi stay soft, we used ¼ cup
- ½ cup potato starch/cornstarch (100 g)
- 1½ cup red bean paste
How to Make Daifuku (Red Bean) Mochi
- Mix the flour and sugar in a medium (steam-able) bowl.
- Add water and mix well until combined.
- Put the bowl into a steamer basket and cover to cook for 7 minutes, then stir with wet rubber spatula and cover to finish cooking another 7-8 minutes. The color of mochi should change from white to almost shiny and translucent.
- Cover the work surface with parchment paper and dust it generously with starch. Then transfer the cooked mochi on top.
- Dust starch on top of the mochi and on your rolling pin (or hands) and flatten out the mochi.
- We found that we needed the rolling pin. Don’t over-starch as it makes leftover dough harder to rework!
- Transfer the mochi with parchment paper onto a large baking sheet. Refrigerate for 15 minutes until the mochi is set. (See Thoughts below)
- After mochi is set, cut out circles with a cookie cutter.
- Ball up your remaining mochi and reroll into a thin layer again and cut out into more circle wrappers until you’ve used up all your mochi.
- Now we’re ready to make daifuku mochi. Take a wrapper and dust off the excess potato starch. Place a scoop of anko on the mochi wrapper.
- Don’t overfill, especially as the reworked dough wrappers won’t stretch as much.
- To seal your mochi, pinch the opposite sides of the mochi wrapper together until all sides are closed. Dust a little starch on the sealed area, adjust the mochi shape as needed and set aside in small cupcake wrappers. Repeat for all mochi wrappers.
- Store in a cool dry place and enjoy within two days.
Thoughts on Mochi Making Part 1
While we tried to starch less than our first attempt, there was still so much breakage in our mochi dough. Because our red bean paste is already sweet enough, we only used 50g of sugar as we didn’t want the dough to be too sweet, so perhaps if we used more sugar the dough would be softer. Also, we wonder if refrigerating the dough is really necessary, since no other recipe calls for this. We noticed that other recipes do not use the cookie cutter method either – which we feel is probably a better idea since the leftover dough from the cookie cutter just never combined fully or looked all that great. The mochi dough portion still doesn’t have the soft chew that we’re looking for, so next time we’re going to try another recipe and method that doesn’t involved steaming!
Check out Part 2 of our Mochi Making Journey here!
Step by Step with Photos


Tools Used To Make This Dish*
You can support our creations at no additional cost to you by using our affiliate links below. Much love!
- Duxtop Portable Induction Cooktop
- Cuisinart Stainless Steel Pans
- Spatula
- Steamer Rack
- Steamer Claw
- Taylor Timer
- Rolling Pin
- Cookie Cutter
- Cupcake Liners
Camera Gear List*
- Sony A7III
- Sony A7rIII
- Sony SEL2470GM Lens
- Sony SEL90M28G FE 90mm f/2.8-22
- Deity V-Mic D3
- Audio-Technica AT4040 Cardioid Condenser Microphone
- Blue Compass Premium Tube-Style Broadcast Boom Arm
- Sirui ET Series Tripod
- White Balance Card
*I am a participant in the Amazon Services LLC Associates Program, an affiliate advertising program designed to provide a means for us to earn fees by linking to to Amazon.com and affiliated sites.