Welcome to Part 3 of our Mochi Making Journey! If you’re just joining us, feel free to catch up with Part 1 here. In Part 1 we tested a pretty standard mochi recipe via steaming, but our mochi kept tearing. In Part 2 we used a cooking directly over the stove method and skipped using a cookie cutter and just worked with mochi squares while hot, which gave us some super soft and delicate mochi. Still however, we were missing the chew.
Today we went to visit the mochi shop in the Bay Area. Benkyodo was opened in 1906, one of the original shops of Japantown and still family owned and operated: a legacy here in the Bay Area. For my family especially, it was the highlight or really the main reason for visiting Japantown. We spent the day window shopping through these cute boutiques and then when we got home, we’d dig into all those pillow soft daifuku – the blueberry ones were our favorite.
The mochi from Benkyodo have been my personal standard for mochi – to my recollection, it was the first mochi I’ve ever eaten in my life, I know I’m blessed! But truly once you’ve had freshly made mochi, it’s a little challenging accepting anything else. Fresh is the only time you’ll get to experience that delicate softness – anything that’s made to last for more than a few days will require some sort of preservative, stabilizer and refrigeration – all of which will affect the texture and flavor.
While we have found some success making soft mochi, we haven’t managed to get the right chew or bite and it’s been driving me crazy! All this time we were using mochiko flour, because many recipes either did not specify or stated that mochiko flour was an acceptable alternative. This could be because mochiko is much more widely available and also cheaper. However, just like our oyaki experience, we learned that the flour absolutely makes a difference: apparently mochiko is less elastic and hardens faster than shiratamako, which is why shiratamako is the flour of choice when it comes to Japanese sweets.

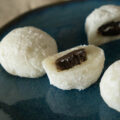
So we finally got our hands on some shiratamako flour from the local Japanese market (more affordable than on Amazon) and this is how it turned out:
Homemade Daifuku Mochi Recipe
Adapted from Namiko Chen’s Just One Cookbook
Materials
- Steam-able bowl
- Large pot good for steaming
- Spatula
- Steamer claw (to move bowl in/out of steamer)
- Bench Scraper (optional)
- Cupcake liners (optional)
Ingredients
- 100 g shiratamako flour (do not use mochiko flour)
- 180 ml water
- 75 g sugar
- potato starch/cornstarch/arrowroot powder for dusting
- red bean paste
How to Make Daifuku Mochi
For a step by step with photos, check out Part 1 here.
- Mix the flour and sugar in a medium steam-able bowl.
- Add water and mix until well combined.
- Put the bowl into a steamer basket and cover to steam on a low heat for 15-20 minutes, checking and stirring the mix at 5 minutes intervals. When the mochi changes from matte to shiny and really comes together, it’s ready.
- Depending on your steaming situation, you may want to wrap the steamer lid with a towel so the condensation won’t drop into the mochi mixture.
- Use the steam time to dust your work surface with starch and to pre-scoop your red bean filling. Roll the red bean into roughly 1-2” balls, depending on the mochi size you want, and set in the refrigerator to firm up.
- When the mochi is done cooking, transfer the cooked mochi on top of the starched surface.
- Use a scraper to fold mochi into a log, then divide into 6-8 pieces.
- Take a piece of mochi and dust off the excess starch from the top side (which will become the inside). Place a ball of red bean paste in the center.
- There are many ways to seal your mochi:
- The simplest way is to pinch the opposite sides of the mochi wrapper together until all sides are closed.
- If you’re familiar with wrapping dumplings, you can work your way around the red bean ball and gather up the sides, tugging the mochi gently up and around the red bean until you can seal it at the top.
- Dust a little potato starch on the sealed area and adjust the mochi shape as needed and set aside in small cupcake wrappers. Repeat for all mochi wrappers.
- Store in a cool dry place (or in the refrigerator on hot days) and enjoy within two days.


Thoughts on Mochi Making Part 4
Verdict? The shiratamako flour really does get us closer to the mochi texture we’re looking for. While the mochiko and shiratakmako flours start and dissolve very differently, the cooked mochi doesn’t look that different. However, it’s really in how the mochi sets, when you chew it, and how holds over the day or two that will be noticeably different. We tested both cooking directly on the stove and steaming and actually ended up preferring the steaming method when we compared the mochi the day after. When we tasted our mochi side by side with the Benkyodo mochi, we found that the texture was much closer, though it still lacks a little bite.
So, what now? Further research has revealed, that technically, we have been literally quite wrong: we have not been making mochi at all. We’ve been making dango. Apparently the distinction between dango and mochi is that using rice flour makes it dango and using actual rice makes it mochi — because (drumroll) that is how you make it mochimochi, or chewy.
That means exactly what you think it means, our mochi making journey is not yet over – join us next time as we attempt to make legitimate mochi, using actual rice.
Tools Used To Make This Dish*
You can support our creations at no additional cost to you by using our affiliate links below. Much love!
- Duxtop Portable Induction Cooktop
- Cuisinart Stainless Steel Pans
- Spatula
- Cupcake Liners
- Bench Scrapers
Camera Gear List*
- Sony A7III
- Sony A7rIII
- Sony SEL2470GM Lens
- Sony SEL90M28G FE 90mm f/2.8-22
- Deity V-Mic D3
- Audio-Technica AT4040 Cardioid Condenser Microphone
- Blue Compass Premium Tube-Style Broadcast Boom Arm
- Sirui ET Series Tripod
- White Balance Card
*I am a participant in the Amazon Services LLC Associates Program, an affiliate advertising program designed to provide a means for us to earn fees by linking to to Amazon.com and affiliated sites.